Dress For the Occasion!

 Tired of Paint Covered Clothes?


I always thought I was a “tidy” painter...until I was looking for something casual to wear and almost everything in my wardrobe had paint splatters on it! I decided that I needed to keep specific clothes just for painting. 


So, recently I had the idea of creating designs for t-shirts and other comfy clothing and accessories. I’ve now set up a store for these items and I’ve even managed to figure out how to integrate it in this website!! 

Just go to the “Clothing and Accessories” tab at the top of this page to browse the designs and products available so far. I have several more designs in the pipeline, but if you have any specific requests or suggestions for designs then please let me know in the comments below or by emailing info@flipzbysooze.com.

Thanks for stopping by. Please remember to sign up for email updates so you don’t miss any future posts. Your email address will never be shared and will only be used to send you updates, approximately 3-4 times per month - and you can cancel your subscription at any time.

Sooze x


20 Best Furniture Painting Techniques

20 Best Furniture Painting Techniques


Every experienced furniture refinisher has their favourite painting techniques and methods for their pieces. They keep up to date with current trends, colours and new products and suppliers.  Gathering all this information can be quite time consuming, especially if you’re a newcomer to furniture refinishing. You go on to YouTube to find a video tutorial on distressing and two hours later you’re still on YouTube but now you’re watching ABBA at the Eurovision Song Contest! I’m not quite sure how that happens, but it always does! 

To save you some time - when you could be painting instead of browsing the internet - I thought it might be useful to put together a post which will point you in the right direction for tutorials on the basic techniques.


Listed in alphabetical order, just click on the link to go to the tutorial. Each tutorial will open in a new window. I suggest you bookmark each one you’d like to learn and save it in a dedicated folder so you can easily find it again should you want to refer back to it.


AGED EFFECT WITH DARK WAX

BLENDING

CHIPPY FINISH

COLOUR WASHING

CRACKLE FINISH

DECOUPAGE 

DISTRESSING

DRY BRUSHING

GLAZING

IMAGE TRANSFER

LAYERING

METAL LEAF

PAINT POUR

PATINA

RAISED STENCILLING 

SALT WASH

USING TOP COATS

UPHOLSTERY PAINTING 

WAXING

WHITEWASHING


I hope these links prove useful, but remember, each one is just a guide as there can be various ways to achieve a similar result. For instance, decoupage can be done with so many materials...napkins, fabric, gift wrap and even wallpaper. Some tutorials will mention products that may not be available in your area/country but you can always find alternatives by searching online. These tutorials should, at the very least, be a starting point. Another great way of learning is to join a Facebook furniture painting group. You’ll find that your fellow painters are happy to answer any questions you may have.

Please remember to leave a comment on any of the tutorials that you find helpful to let the person know that you appreciated them sharing their expertise.

I’d also appreciate it if you would leave a comment on this post if you found it useful. I have lots of interesting articles coming up, so please sign up for email updates at the left hand side of this page. Your email address will never be shared and will only be used for the purpose of keeping you up to date with my posts...no more than 2-3 emails per month.

Thanks for stopping by and please visit again!

Sooze x


Catching Up on Admin!

The past few days have been busy - but not with painting. We’d just returned from a long weekend away in the country, so I was feeling invigorated and ready to tackle all those time consuming “admin” tasks I’d been avoiding for too long. I thought it might be useful to share those tasks here, for those of you who are just starting out on your journey in furniture refinishing.


Social media - love it or hate it, it can be one of most effective ways of getting your brand “out there”. Set up business pages on Facebook and Instagram, post regularly (and not just “for sale posts) and join groups. I don’t view this as a task, mainly because I’m always checking my social media accounts, but one of the things I’d been meaning to do for ages was to change my page template and header. I had recently created a new logo in an app called Canva and wanted a coherent look across all my online accounts. If you’re going to have an online presence over several platforms then I believe it’s important to give them as consistent an appearance as possible. Not only does this make things easier for you but it creates a recognisable brand. 

Get a logo! It doesn’t have to be fancy, even the name of your business in text is fine. As I mentioned above I recently designed a logo that I now use across the board as well as using it as a watermark on my photos. One of my tasks this week was to reformat my logo. I wanted a “solid” version as well as the png format (transparent background) I already had. The png version works well on photos because of the lack of a coloured background. If you don’t have a logo yet I would suggest you try to get to grips with an app like Canva...there are lots of tutorials on YouTube that will help you. You can also use Canva online at their website. Otherwise you could try something like Photoshop, which makes saving a png file very easy...just make sure to start your “document” with a transparent background.


Updating your blog/website - this is something I’m not the best at. Sometimes it’s just because I have nothing of interest to share and other times I just can’t motivate myself to get it done at the end of a busy day painting! If you struggle with content, like I do, then it helps to keep a notebook where you can jot down ideas as they come to you. I have a list of tutorials I plan on doing, plus some helpful hints and tips for the furniture painter. Nowadays people seem to prefer a video tutorial to a written version, so if you’re comfortable with appearing on camera then that’s the way to go. It’s something I really need to tap into!

On the subject of content, I find it very helpful to take photos and video clips of each stage in refinishing a piece of furniture. Not only can you post photos of your progress to your Facebook and Instagram accounts, but once the piece is finished you can put them al together to make a short video. There are various apps available that make this a simple process. One that I’d recommend would be Ripl which is very user friendly, even for the beginner. You can also find it online here. I now use iMovie as it gives me more options and much more control over the finished video.

One of my most time consuming tasks this week was to upload some of my graphic designs to a Spreadshirt shop I opened a while ago. It’s a store platform where creatives, artists and graphic designers can sell their designs on clothing and accessories. I hadn’t really done anything with it, mainly because I had a distinct lack of time!  First of all I had to create some designs which I hoped would appeal to my fellow furniture refinishers and upcyclers. I managed to get around half a dozens designs done in Photoshop so it was just a case of getting the store set up and getting those designs onto products. I then had to configure the products and customise the store to reflect my branding. Fun to do but I had to put several hours aside. I then wanted to integrate my store into this blog, which wasn’t nearly as difficult as I thought it would be. It should be much simpler to keep the store updated as and when I create new graphics...and I have LOTS of ideas!

The final task on my “to do” list was to add some channel art to my YouTube account. Luckily Canva provide a template for just that purpose (along with others for social media posts). My channel is still in it’s infancy but I still wanted it to reflect the same branding I had on my other online accounts. So now all the basics are done I can get on with creating and adding content. I can now look forward to picking up my paintbrush and getting started on a commission piece that’s arriving tomorrow! 

I hope you found something useful in this post. It really is aimed at those who are thinking of, or have just started, to take their hobby to the next level. As a relative newbie myself it gives me pleasure to share what I’ve learned over the past year or so! I’ll be talking about building a customer base and how to start with commission jobs in my next post, so please either subscribe to the blog or sign up for email updates. You’ll find the forms on the left side of this page. Also if you have a request for me to cover a particular subject then please get in touch using the contact form. Join me on my journey!

Until next time,

Sooze x


I’ve Finally Done It!

I may not be the most tech savvy person in the world, but I can usually find my way around a computer without too many problems. So, when I decided that the blog was in need of a fresh new look I thought it was just a case of changing the template. Well, yes it was....to a point. 

There was nothing too technical involved but I got a little carried away with the customisations options and played around with them for a couple of hours. I’m now happy with the new look and I think it’s easier to navigate. You can find blog pages, archives, contact form, etc in the left side toolbar which I think is much clearer than it was before. If you have any constructive suggestions for the layout I’d be happy to hear from you!


On the subject of new beginnings, I’ve also just re-opened my Etsy store. I originally set it up last year, had a sale and a couple of commission requests then it went quiet. I decided to close the store and do a bit of research on how I could optimise it, as I wasn’t getting much traffic. In the past week I’ve noticed that numbers are increasing just by linking all my accounts, I.e. Facebook, Instagram, YouTube, etc. It’s seems obvious now, but by letting visitors know of your presence on other sites it can really help improve traffic. For instance if someone reads this blog they may wonder how they can make a purchase or ask for a quote for commission work...if they know you’re on Etsy then they can look at your store. Likewise, if they find you while browsing Etsy they may also be interested in your processes which you share via Facebook. Like I said, it’s obvious now that I’ve put some thought into it. 


On a final note, I’d really appreciate it if you could leave a comment after reading any of my posts and to share it with your friends. You can also subscribe to receive posts by email by entering your email in the Subscribe box in the sidebar. If there’s anything relating to furniture painting or papercraft you’d like me to feature I’ll do my best to oblige.

Thanks for stopping by!

Sooze x

Find Flipz by Sooze on Facebook, Instagram, YouTube, Etsy and Spreadshirt.


I’m Back!

It’s been a while since I’ve posted...many reasons why but mainly health reasons, home renovations and with this pandemic going on I’ve not been able to source any new pieces. However, as things ease up a little I have been getting back into my groove with furniture refinishing.

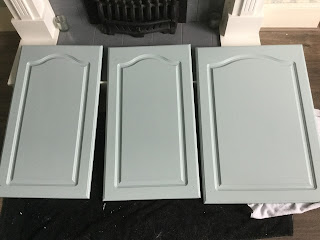
I’ve wanted to update our kitchen cabinets for a long time. There was nothing wrong with them except the white was starting to yellow. I’d seen several articles online about people removing the “wrap” from their cabinet doors but I was reluctant to try, just in case it ruined otherwise serviceable cabinets. I finally convinced hubby that we should give it a go and much to our surprise it was a cinch! It took literally two minutes for each door...here’s the video that shows how it’s done.


After removing the wraps it was time to sand, prime and paint each door....quite time consuming but very satisfying! I’d chosen my favourite colour - duck egg blue - and it looked lovely while I was painting in front of our large living room window. Once we rehung the doors in the somewhat dark kitchen it completely changed the colour to a darker blue, which I’m not loving! We decided to live with it for a few weeks but I’ve decided to repaint in a pale grey. I’ll be posting an update on this once it’s finished!


We also did a much needed renovation of our bathroom, which was stuck somewhere in the mid 90s, complete with pine clad ceiling! We had to get a plumber in to hook up the toilet, sink and bath but other than that it was mainly down to hubby. I’m delighted with the outcome...hubby says he’ll never tile again!! 


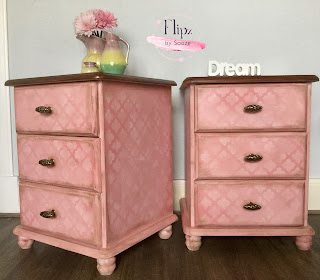
So, back to furniture painting! I’ve managed to complete several pieces recently and I thought I’d share them with you here. 


I’ve had so many people ask how I achieve the vintage look to the green bureau/desk and the pink bedroom furniture so I thought I’d make a little video to share my process. If you’d like to see other techniques I use please message me and I’ll do my best to oblige. 🙂 For now, I hope you enjoy this one - I’d love to see your results if you try this method!


That’s it for now. I’ll be sharing more of my furniture painting adventures with you in my next post. Thanks for stopping by and please subscribe (at the top of the page) to see future posts, or come visit me on Facebook at Flipz by Sooze.  I can also be found on Instagram, YouTube  and Etsy.

Sooze x