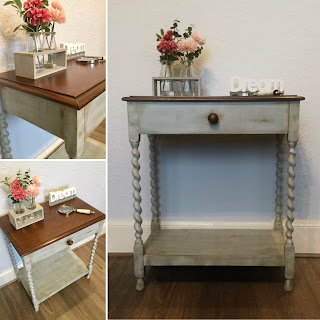
In this post I’ll be showing you the steps I took when painting a vintage side table. Many beginners have lots of questions and I hope this post will answer at least some of them! For those more experienced painters, you may want to comment with different methods you use.
This pretty little side table was in sound condition but quite badly scuffed and scratched, so a makeover was definitely in order. I started by cleaning with sugar soap and warm water. Sugar soap acts as a great degreaser and will remove sticky deposits and general dirt. Once dry, I sanded the top, sides and shelf with an electric sander...the barley twist legs had to be done by hand. For hand sanding I recommend starting with 80 grit sandpaper followed by 120 grit. Remember, with sandpaper the higher the number the finer the grit...and the finer the grit the smoother the finish you’ll end up with.
Following the sanding I washed the whole piece with sugar soap and warm water again. This helps to remove the dust caused by sanding as well as any residual grease. Once I was happy that the top was clean and smooth I gave it three coats of dark walnut wood stain, using a foam brush and allowing each coat to dry completely before adding the next. I also like to sand very lightly with a fine grit sandpaper between coats to ensure a smooth finish.
Next step was to apply a primer coat. I don’t use a specialist primer paint...just any light coloured matt emulsion I have to hand...and I do a very light coat.
That’s the prep all done! Now on with some colour. In this case I chose a pale green chalk paint and gave it two coats, with a very light sanding between coats.
I wanted to add a little texture to give it some interest, so with some white paint I did a little dry brushing to create a cross-hatch effect.
I usually leave the paint to throughly dry overnight before going in with the wax. I love the effects a coat of wax can bring to a piece. For this little table I applied a coat of clear wax first, left it to dry for an hour then buffed lightly. White wax was then applied to corners, edges and the barley twist legs as well as a little dark brown wax in some areas. The table top was given two coats of brown wax to enhance the dark wood.
I hope this post has answered some questions that beginners may have had about the process of refinishing a piece of vintage furniture. If there is anything you’d like to ask please either leave a comment on this post or use the contact form.
Next time I’ll be talking about stencilling on an old pine bookcase. Please join me by subscribing.
Thanks for stopping by!
Sooze


No comments:
Post a Comment
Thanks for taking the time to leave a comment!