Be Creative With Colour!

I love to play with colour! This applies not only to my furniture painting but also to the other hobbies I have, such as card making and scrapbooking. My designs always start with colour choices.


Sometimes a piece of furniture will “speak” to me. For instance, a child’s vintage dressing table just had to include pink, florals and soft colours.


A gent’s tallboy screamed “green” to me and I was really pleased with the outcome.
Would a deep green have worked as well on the child’s vanity? It wouldn’t have been to my taste, but it may have appealed to someone else. While it’s great to be creative with colour, sometimes we have to choose wisely to appeal to more buyers if the piece is being finished to sell. Of course if you’re painting a piece for your own home then you would paint it to suit your taste and decor. My favourite colour is duck egg blue and while it’s a popular seller I know I couldn’t paint every piece in the same shade! Having said that, a lot of painters will tell you that their local market prefers white pieces so they tend to paint mostly in white. Whatever works in your market!


Because colour is such a huge thing for me I tend to have lots of different paint “in stock” so when I come to refinish a piece I always have a good choice. I also like to mix custom colours, so having a good choice of paint is a must. When mixing a custom colour I always start with small amounts to work out my “recipe”, which means it can be replicated if I haven’t mixed enough for the job. I’ll be writing a post on custom colours soon, so if you need some hints and tips in that area please subscribe to the blog so you don’t miss it.

And then we have blending! This is my absolute favourite technique in painting. You can play safe or go crazy depending on the piece of furniture or just how you feel on that particular day! My blending has tended to be fairly subtle in the past but I’m just waiting for the right piece to come along that will look good with a more eye catching blend. Copper patina is also high up on my “to do” list! I’ll be posting more about these techniques in the coming weeks.
Stripes are another good way of using more than one colour.it can be time consuming with all the taping involved but can give really stunning results, especially if you add “pinstripes” to the design.


Again, you can be as subtle or as daring as the mood takes you.


I’ve also tried buffalo checks - even more time consuming than stripes - which I was very pleased with. Most buffalo check designs will be done with white and a darker colour, but who says you can’t do it in, say, red and green if that’s what takes your fancy?


It’s a very effective technique whichever way you choose to go with it. It’s also easier to achieve than it looks!


My next project is an Edwardian chest of drawers, which I originally intended painting in a dark damson colour. However when I went to buy the paint I ended up with something totally different! These colours just stood out on the colour chart and are different from anything I’ve used. I think they’ll work together well as a blend. I’ll share the process and the outcome in my next post.

If you’re less than confident in using colours in your furniture painting, a good idea is to look around you for inspiration. Join some Facebook furniture painting groups - most are happy to give advice and you can pick up loads of hints and tips. Watch YouTube tutorials - they will teach you all the techniques you want plus some you didn’t even know existed! Blogs are another source of inspiration as is Pinterest. Colour wheels are also a huge help when planning a colour scheme.

So, whether you’re brave with colour or a little shy of it my advice would be to paint what you like and if it doesn’t go quite to plan.....paint over it!

See you next time! Please click on the Subscribe link at the top of this page to receive notifications of future posts. Also, if there’s anything you’d like me to cover then you can use the Contact form.

Sooze x


Old to New - Step by Step

Every furniture painter who wants a quality finish on their pieces will have a similar method of refinishing...clean, sand, clean, prime, paint, wax/finishing coat. Well that’s my method anyway and there will be some who leave out a step or add a step. As I said in my previous post “prep is everything” and I believe if you want a lasting finish it’s a vital step not to be missed out.

This post also addresses the comments that furniture refinishers sometimes get from people, such as “anyone can slap a coat of paint on” or “ why is it so expensive? It only takes a couple of hours to paint a chest of drawers”, etc, etc. Sometimes they just don’t realise how many steps are involved in refinishing an old, scratched, chipped piece of furniture.
The example below shows MY method...it may not be yours! I should say that not every piece requires the same prep and some require repairs to drawers, chipped veneer, wonky legs, etc. Some pieces may just be prepped then given a basic paint job in a single colour. Others might be painted with blending effects, decoupaged, stencilled, gold leafed or other more intricate finishes.

So, here we go.... get your cuppa and biscuits out as this is going to be a long post!

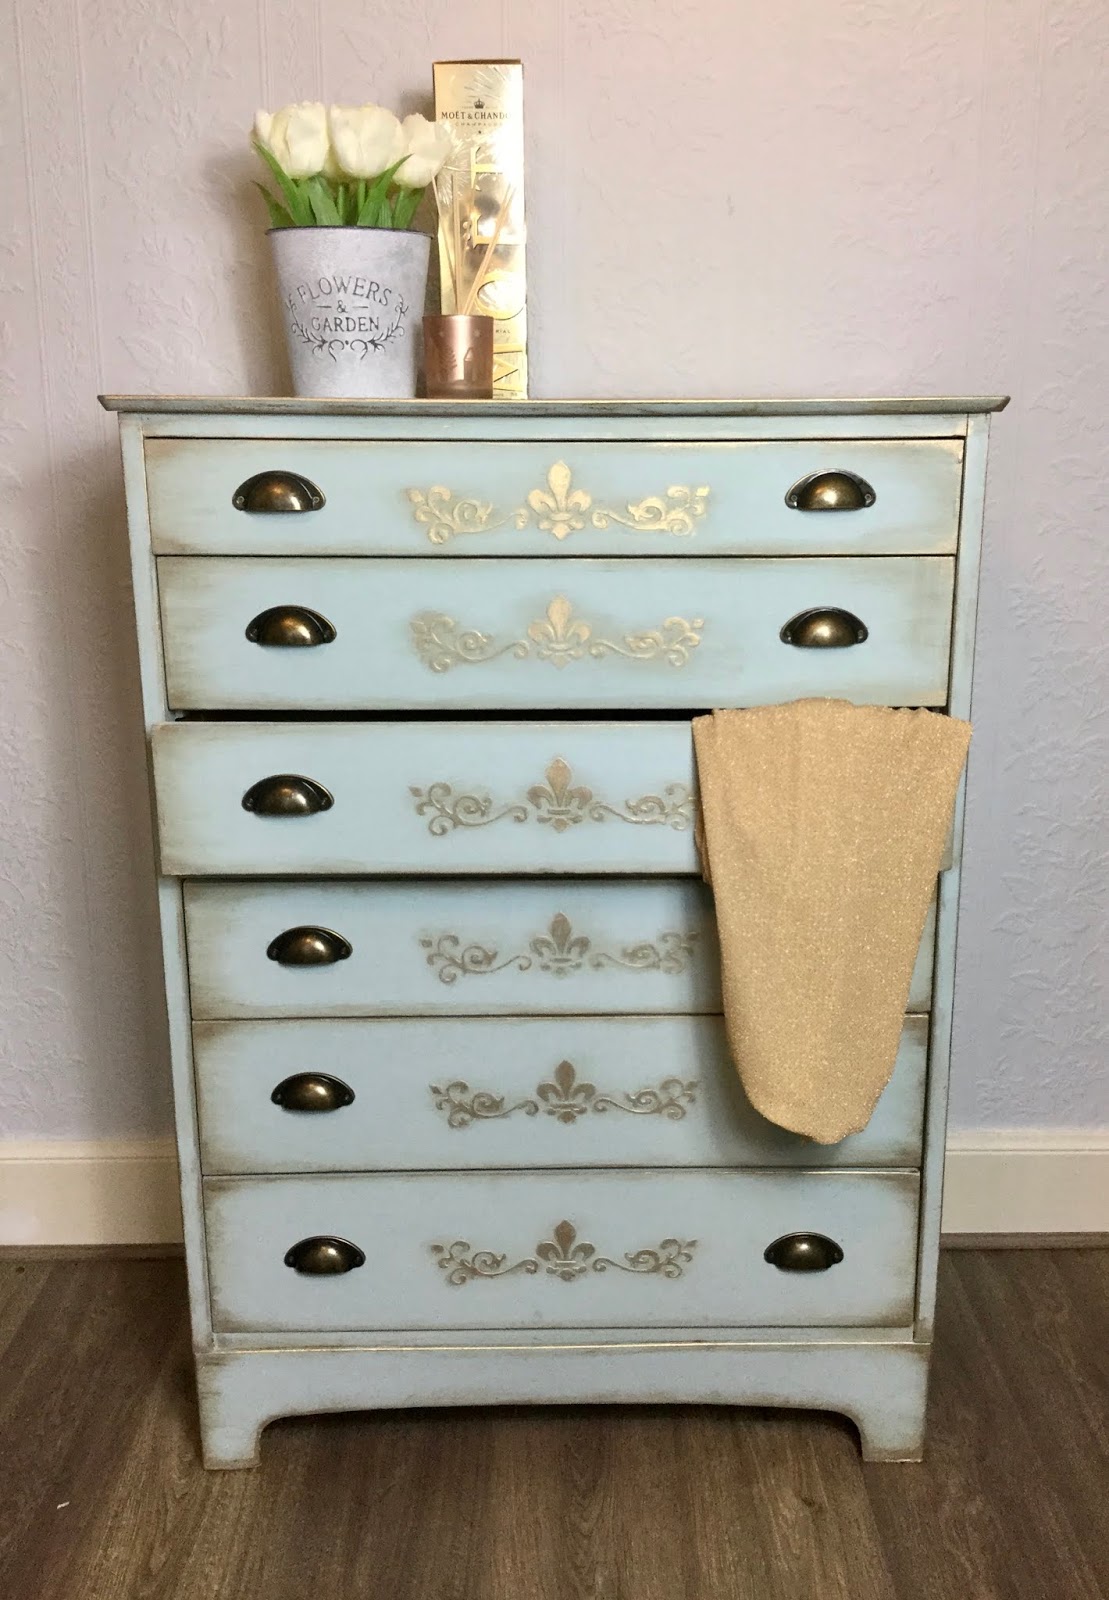
This tallboy was in a bit of a sorry state when I purchased it - it was crying out for a makeover!

The first thing I do on any refinish is to take off the old hardware. As you can see, two drawer handles were missing, so the whole set had to be replaced. I always keep the original hardware, as it can be re-used on another piece. Removing the hardware is essential for the sanding stage anyway and I always like to give them a good clean (while still retaining their patina).
Next step is to give the whole a good clean...I used a damp cloth to remove any dust and fluff on the inside while the outside got a thorough cleaning with sugar soap, then rinsed with lukewarm water and allowed to dry completely. If you haven’t heard of sugar soap just ask your dad what he used to clean a wall before hanging wallpaper! It removes dirt, oil, grimy build up and even some nicotine stains. I believe that while sugar soap is widely used in the UK and Australia it’s not so well known the the US, the nearest equivalent being TSP.

Once dry, and before sanding, I filled in any deep dents and scratches or small areas of missing veneer with a paintable wood filler. Once that was dry I sanded the whole piece with an orbital sander (I also use a mouse sander on smaller or more detailed pieces). I started with 80 grit sandpaper to remove most of the old varnish/paint, then went over it with 120 grit to give a nice smooth finish. It’s important that you don’t over sand as a lot of furniture veneer is quite thin!
Sanding can be quite a laborious task - not my favourite part of the process by any means, but as I’ve said previously your finish will only be as good as your prep. I know a lot of chalk paint manufacturers tell you that no prep is required but in my experience no prep equals an uneven finish that just won’t last without chipping.
After sanding I go over the whole piece with a damp cloth to get rid of the dust. It’s important to have as clean a surface as possible to get good results when you start painting.
Next step was priming. On this tallboy I was expecting some bleed through, so I knew it had to be well primed before painting. Bleed through is a staining that will show through your paint and is caused by a variety of reasons, such as natural resins in the wood “bleeding” into the paint (a good example of this is knots in pine). Sometimes bleed through is caused by the piece not being allowed to dry properly before applying your paint. Mahogany and cherry will usually bleed quite badly and can cause a discolouration and staining to your paint, so they need to be primed, preferably with a shellac based primer. In the case of this tallboy I was able to use my “go to” product - Frenchic Finishing Coat. I used two coats, allowing it to dry for an hour between coats. Prep finished!

My colour choice for this piece was a pale duck egg blue chalk paint. I painted one coat then went over it lightly with a high grit sandpaper just to smooth out any little uneven areas. I wanted to do something to liven up the drawer fronts, as the whole piece was quite plain. I decided that a raised stencil would give it some dimension and some personality. As a papercrafter I use several die cutting machines and I knew my Brother Scan n Cut would be perfect for cutting a stencil in Mylar, so out came the machine and after changing some of the settings and creating a design I had a homemade stencil all ready to use!

I could have used the stencil in the regular way, by stencilling on top of my final coat of paint in a contrasting colour, but I wanted it to look like it was part of the original piece so I used some modelling paste after the first coat of paint. It takes a while to dry completely, so I left it overnight before adding a second coat of paint.
I love the way the stencilled area looks. It’s quite subtle, once painted, but very effective. This photo shows the stencilled area before paint was applied.

Of course, you could use a coloured modelling paste and simply do your raised stencil after your final coat of paint if you wanted to.

You can see in this photo how the stencilled area now “blends in” after two coats of paint and it looks like it was always there! I didn’t want to leave it like that on this occasion - I just knew I wanted gold highlights on this piece and the stencil was just calling out to me!

Before adding the gold I used a fine grit sanding block very lightly over the whole piece to smooth out any tiny bumps. I like to run my hand over the whole surface so I can feel for any imperfections as they’re not always noticeable at a glance. I then wiped off any dust created by the sanding and applied some dark wax to the edges of the drawers and the body as well as to the stencilled area. I use dark wax on almost every piece I paint as I really love the aged effect it gives.

White wax is another favourite of mine as it can give a whitewashed look and can add a nice effect when added to a pale coloured piece.

Now the tallboy was ready to be glammed up! I decided to use my Shiva oil paint stick in Antique Gold - I didn’t want as bright a gold as using gold leaf would have given me. Also, I find gold leaf really messy to work with, especially in larger areas.

I use gloves when applying the oil paint stick as I like to blend it in with my fingertip and it can be a little difficult to wash off.

You just use these sticks like a crayon and then blend over the area you want to cover. The different colours can be blended together to get gorgeous effects. I have the set of 12 iridescent colours and have used a combination of colours on several pieces of furniture to great effect. Because the sticks are made of oil paint they do have a longer drying time...up to 48 hours if applied thickly. Once cured it’s there forever! In this case, because I’d applied a very thin layer to the stencils and the drawer edges, I left the paint to cure for about 24 hours before testing it with my fingertip.

All that remained to be done to finish this makeover was to apply two coats of clear wax and add some new hardware. I allowed the first coat of wax to dry for an hour then buffed it lightly before adding the second coat.

I chose antique gold/bronze cup handles which I thought looked smart on the drawers and wouldn’t contrast too much with the gold stencilling.

And there you have it...one tallboy chest of drawers has been given a new lease of life and will last for many more years!


Thanks for stopping by and please feel free to leave your comments below this post. If you have any questions you can use the contact form in the sidebar. I would also appreciate it if you would subscribe to the blog to receive notifications of future posts via email.

Sooze x


Recycling is the Way to Go!

Hello and welcome to Flipz by Sooze, my little spot on the internet where I hope to share my adventures in the world of furniture refinishing and flipping!
Recycling, refinishing, revamping or in some cases upcycling furniture – whatever you choose to call it –  isn’t new. It’s been going on for generations! You, your parents, grandparents and generations before that may have passed on unwanted pieces to friends or family, especially those setting up their first home. Most of us have received a table, chair, sofa, etc from mum and dad on moving into our own place – and very grateful for it we were! 
Nowadays we are all more aware of the need to address the problem of overflowing landfill sites and recycling is the perfect solution. Why throw out an old chest of drawers just because it’s looking a bit scruffy and worn? With some hard work, paints, waxes and lacquers that old piece of furniture can be brought back to life and last for many years to come. 

When I first started painting furniture, many many years ago, it was out of necessity. I loved going to charity shops and coming home with a beat up desk or chest of drawers and giving it a new lease of life. Not only did it save money, I was able to customise the pieces to suit my home. These days I still do it for the same reasons but also just because I enjoy the creative process. I’ve found that people seem to like my pieces, hence Flipz by Sooze was born!

I hope you’ll join me in my furniture refinishing adventures where I’ll describe the processes I use and share some techniques, hints and tips. 

Sooze

Prep is Everything!

I have learned through trial and error (despite some paint manufacturers’ claims) that when it comes to refinishing a piece of furniture preparation is probably the most important step in achieving a perfect and long lasting finish.

In this post I’ll be showing you the steps I took when painting a vintage side table. Many beginners have lots of questions and I hope this post will answer at least some of them! For those more experienced painters, you may want to comment with different methods you use.
This pretty little side table was in sound condition but quite badly scuffed and scratched, so a makeover was definitely in order. I started by cleaning with sugar soap and warm water. Sugar soap acts as a great degreaser and will remove sticky deposits and general dirt. Once dry, I sanded the top, sides and shelf with an electric sander...the barley twist legs had to be done by hand. For hand sanding I recommend starting with 80 grit sandpaper followed by 120 grit. Remember, with sandpaper the higher the number the finer the grit...and the finer the grit the smoother the finish you’ll end up with.
Following the sanding I washed the whole piece with sugar soap and warm water again. This helps to remove the dust caused by sanding as well as any residual grease. Once I was happy that the top was clean and smooth I gave it three coats of dark walnut wood stain, using a foam brush  and allowing each coat to dry completely before adding the next. I also like to sand very lightly with a fine grit sandpaper between coats to ensure a smooth finish.
 Next step was to apply a primer coat. I don’t use a specialist primer paint...just any light coloured matt emulsion I have to hand...and I do a very light coat.
That’s the prep all done! Now on with some colour. In this case I chose a pale green chalk paint and gave it two coats, with a very light sanding between coats.
I wanted to add a little texture to give it some interest, so with some white paint I did a little dry brushing to create a cross-hatch effect.
I usually leave the paint to throughly dry overnight before going in with the wax. I love the effects a coat of wax can bring to a piece. For this little table I applied a coat of clear wax first, left it to dry for an hour then buffed lightly. White wax was then applied to corners, edges and the barley twist legs as well as a little dark brown wax in some areas. The table top was given two coats of brown wax to enhance the dark wood.

Again, I left the wax to dry...this time overnight...before buffing it well. And with that final step we now have a fully refinished side table that would look good in any home!
I hope this post has answered some questions that beginners may have had about the process of refinishing a piece of vintage furniture. If there is anything you’d like to ask please either leave a comment on this post or use the contact form.

Next time I’ll be talking about stencilling on an old pine bookcase. Please join me by subscribing.

Thanks for stopping by!

Sooze

Chalk Paint - Yay or Nay?

I was scrolling through my Facebook wall one day early last year - laughing at jokes, admiring friends’ photos and watching the odd music video when something else caught my eye. It was an ad for  Frenchic, a new(ish) brand of chalk paint based here in the UK. After reading all the blurb - and remembering how much I used to enjoy furniture painting - I joined the Frenchic group and was awed by the photos of their work that group members had posted. Of course, I just had to go to the Frenchic website and put in an order.


As hubby and I were about to begin redecorating our living room, I decided that my first chalk paint project should be the fireplace tiles and mantelpiece. We planned on a much lighter colour scheme so the dark mantle had to go...and I didn’t like the tiles.


Happy with those results I decided to paint our dining chairs and the table pedestal. Again, I was pleased with the way they turned out once I had reupholstered the chair pads.


I did both of these projects according to the manufacturer instructions i.e. no sanding, no priming required. Has the finish lasted? To a point, yes, but the tiles on the fireplace have chipped in several places and there is a small chip on one of the dining chairs. I need to say that I loved working with this paint and now that I’ve used it (and other brands) on numerous pieces I would always recommend sanding and priming as I think prep is everything!

Since then I have painted many items and with proper preparation - and finishing with at least two coats of protective wax - have found that the results are much better. Thorough prep, in my opinion, is absolutely essential to achieving a perfect and long lasting finish.

So, do I use chalk paint on all my pieces? Nope. I do use it on some pieces but not all. Sometimes it just comes down to the finish I want to achieve or the higher price of chalk paint. Quite often nowadays I will make my own chalk paint from matt emulsion (more about that in another post).

I have two pieces of furniture in my craft room that I painted in the spring of 2010 that look as good now as the day they were painted...they were both done in an eggshell finish paint without any protective finishing coats.

Would I recommend chalk paint for furniture? Yes I would, but I think any good quality paint can give excellent results if you take the time to do a proper job. My next post will outline the steps I take when painting a piece of furniture, so please subscribe and come back soon!


Too Many Hobbies - Not Enough Time!

I have too many hobbies! I love paper crafting (card making and scrapbooking mainly), sewing and knitting occasionally, photography and bits and bobs of other crafts as I discover them.
A scrapbook layout of hubby and I soaking up the sun on a holiday to Spain
One of my cards
Something I never really thought of as a hobby has recently pushed its way into my crafting life again. I’ve always enjoyed revamping old furniture – partly through necessity when I was young and money was tight and later on when I wanted to bring a nice piece of old furniture back to life. 
An old and unloved bureau, now revamped and looking smart in navy
I hadn’t upcycled a piece of furniture for several years when I recently decided to give chalk paint a go….and  I was hooked! Since getting back into this satisfying “craft” I’ve decided that this is where my heart lies in terms of being creative and working with colour and, hopefully, the start of a small business which will take me into retirement. I’m enjoying learning new techniques, such as blending and distressing and hope to share my learning journey with you as I go.

I’ll be sharing my projects here on the blog – successes and failures! I’d love to hear your feedback, see your photos of  your favourite crafting  projects and share some hints and tips. 

Thanks for visiting and please come back soon!

Sooze